A storyboard is a sequence of drawings that paints a visual preview of how each scene of your explainer video will look. It is one of the core constituents of video pre-production and shapes the visual direction your animators or cameraman will follow for the production.
Think of the storyboard as the visual script for your explainer video. It brings everybody involved in the production process much more clarity and helps keep the visuals focused on your message, particularly if your time is limited.
In this article, you’ll learn how to storyboard your explainer videos and how doing so contributes to the effectiveness of the final result you get.
Content
The Value Of Creating A Storyboard For Your Explainer Video
Here are the main reasons you need to create storyboards for your explainer videos.
Provides creative direction
First, you need to create storyboards for your explainer videos because you can’t start a video production with an empty screen and a script or the voice-over. The production team needs to know the scene they are looking to capture before they can achieve your desired results. That’s where storyboards come in.
Storyboards break down the different scenes of the target explainer video. They provide directions and previews of what the explainer video would look like once finished. And so, they help the production team know exactly what to capture or illustrate.
For example, if it’s an animated explainer video, the storyboard will help choose the specific animation and graphics needed.
Matches visuals with narration
Explainer video storyboards are designed like comic-driven square-like boxes where each box illustrates a frame of the actual video. Each box features what should be seen and heard in the specific frame and adds a note describing how the frames should come together to form scenes.
In other words, storyboarding helps you paint all the scenarios of the video you’re aiming for, frame by frame. You get to decide who or what should be featured in the video, what the characters should be doing, and the words they should be saying.
Minimizes guesswork and mid-production problems
Creating a storyboard allows you and the video production team to visualize and validate your ideas and avoid rushing into production. You can even use it to get feedback from your teammates on your marketing orientations. This minimizes the risk of setbacks during production, such as revising characters or props, re-shooting certain scenes, a long creation process, and more.
In addition, storyboarding an explainer video requires you to imagine the flow of the video, the details of each frame, background objects, the characters’ dialogues, movements, transitions, character designs, video sequences, etc.
This provides a roadmap for the entire production process for your producers. It also leaves them with little room for imagination and guesswork, as they must stick to the “agreed upon” storyboard and execute it.
Top 2 Explainer Video Storyboard Types
Here are the two most popular ways of drawing your explainer video storyboards.
This is the traditional approach to drawing storyboards. It involves using ink or pencil on paper to create visual representations of each frame of the video, taking inspiration from the script or the voice-over. You can think of it as creating several thumbnails—representing each frame of your video—and adding notes to describe the scenes to get producers to envision what you have in mind.
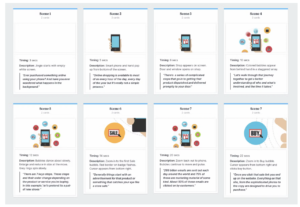
As the name suggests, digital storyboarding involves using technology to outline scenes for your explainer video. Usually, these storyboards are created with gadgets such as computers, phones, and tablets using tools like Illustrator, Photoshop, etc. A digital storyboard is the best way to make animated explainer video storyboards.
Tools like Milanote facilitate the creation of such storyboards. But as you can see, it requires some can-do, and not everybody will have the ability to do it. It’s customary to see brands offer templates of these.
Keep in mind that digital storyboards could also mean using computer software to create a whiteboard or digital hand-drawing-like storyboard, like below.
These storyboards are created using storyboarding apps like Boords. The apps generally have templates as well as animatics of characters, environments, backgrounds, props, etc.; you can copy-paste or drag and drop in frames to create your storyboard.
5 Steps To Storyboarding Your Explainer Videos
Here are five steps you can follow to create your first explainer video storyboard. Let’s jump into the first one.
Step 1: Start with a script/voice-over.
You can’t create a storyboard without first creating a script or the voice-over. Think about it; it’d be like shooting a video without instructing actors on the message or dialogue. The script or the voice-over represents the message. And you need to ensure smooth integration between what is being heard and what is being seen.
So, start with a persuasive script describing how you can solve your target audience’s pain points. Make it 1-2 minutes long and chunk it into scenes. The script will help you focus on the objective and critical message of the video. It’ll also help you review your storyboard and ensure a good flow to your video.
Step 2: Align your storyboard with your goal and brand
Your goal with this step is to help convey your message exactly how you want it while ensuring that you control how all is done. The following are actions and technicalities you need to get straight before even grabbing your pen or jumping into the interface of a storyboarding tool.
Consider your message
How will the scenes you have in mind complement the message in your script? You need to take the time to work with your teammates and brainstorm ideas about visuals that best illustrate what you want to convey for the message.
Consider your target audience.
It doesn’t matter how creative your visuals are. If your viewers don’t understand what they see in your explainer video, all your efforts and investments are going down the drain—and that’s a promise. Take the time to figure out what visual elements or video style is the most appropriate for your target audience.
Also, you will need to consider what the people watching your video need or want to see and ensure you cover it. If your explainer video does not meet their intent or satisfy their query, you will most likely lose them to competitors.
Choose the type of explainer video you want
First, do you want a live-action explainer video or an animated one? Or maybe a combination of both? Or, if you choose an animated explainer video, which type do you want? Whiteboard animation, 3D animation? Motion graphics? Etc.
Keep in mind that your product, message, and target audience should inform the type of explainer video you decide to produce. Think about it, creating a live-action video for a software application will be a disaster. In this very instance, people will best learn from an animated video, and that’s precisely what you will need.
Define the explainer video length
How long do you want the video to be? The video’s length will also inform how you storyboard it, specifically how many frames and sequences you include. Explainer videos perform best when short. The ideal length for an explainer video is around 120 seconds. Exceeding this, viewers lose interest, and the retention rate slumps. So keep that in mind and only focus on what’s important.
Know how much producing your video will cost
Explainer video production costs mainly vary based on length and style (animation or live-action). So, as you storyboard your explainer video, you need to ensure your target video is not outside your budget.
Step 3: Draw your storyboard
This is the most exciting part. It’s literally where you start creating the actual storyboard. It doesn’t matter how good or bad your drawing skills are; you just need to come up with very creative illustrations of how you want to show your story on screen.
When you’re finished drawing your storyboard, you can easily look at it from start to finish and see if it flows well. That said, here are the specific elements you must include and the steps you need to follow.
Create your characters
Start painting the scene with a clear illustration of your character(s) and their traits. Be sure to nail down their physical appeal. Include how you want your characters to strike viewers. Consider detailing their behavior and expressions.
Make a list of supporting elements and graphics.
A lot of elements and graphics contribute to creating explainer videos; you need to specify them all with as much detail as you can include. Detail the props, the supporting graphics you need, objects, backgrounds, and more.
Portray the environment
Let your video producers visualize your scene by portraying the environment in your storyboard. Try including the room, the table, the moving subjects, etc. Describe the mood, the atmosphere, etc.
Sketch your story
Simply draw square boxes and add your characters, supporting elements, background, and literally paint the environment. You can draw characters using stick or comic figures. Or even better, you can do it all using a storyboarding tool that already includes characters and elements. You’ll only have to bring them together based on your imagination.
Include all the on-screen text
Write the text you want to appear on the screen and what time you want the text to appear. Let the producers know the specific areas you want the text to appear and how you want the text animated. Keep it short and sweet, so you don’t overwhelm viewers or tamper with their viewing experience.
Include a shot list
Videographers use shot lists to plan all the clips needed and describe them in detail. So, include a shot list to let your video production team know what you expect from each scene.
Essential tips
Add as much detail as you can
Include things like the location and daytime you need the video shot. List all the props you will want to see in the video.
Nail down the direction.
Focus on which sequence is the most logical. Decide on the animations and how they will appear. If it’s a live-action video, define camera angles that best recreate your scenes.
Use visual metaphors
Break away from boring shots and straightforward visuals. Visual metaphors aid your explanation and make the explainer video fun to watch.
Mark or align your scenes
Let the video production team know how you want the scenes to flow. You can do this by aligning your shots or clearly marking your thumbnails to let them know.
Break it down into slides
How you sketch the video is entirely your choice. Either way, use a blank slide as it will allow you to create anything you want and help with the organization.
Using a blank slide gives you space and keeps you from stuffing the page with square boxes that make it hard to understand your storyboard.
Also, it will be easier for the production team to isolate each frame, present it to team members, and produce it properly.
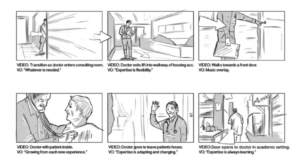
Step 4: Add the script and notes
Include the lines from the video script below each scene to help the voice actor understand the scene and to help the shooters or illustrators animate each scene to perfection.
This will help the producers understand the thought process behind the scenes and better recreate them in the explainer video. Think of it as comic books, except all texts are kept well-arranged below.
Also, you can add directive notes about the shots and cuts. For example, you can choose a specific transition for a scene, specify an action the character or actor must perform in the clip or at a particular moment of the clip, etc.
Step 5: Be flexible and open to changes
By now, you’ve already created your storyboard and are ready to get your video production team to work on it. It’s advisable to have a teammate review it to ensure it is aligned with your brand messaging and your across-the-board marketing strategies.
Also, you should let your video production team inform you on the best approaches to production, and how to best attain the creative you’re aiming for. These are professionals, and they’ll have more experience than you do, video-wise. That’s why their insights are essential to your explainer video’s success.
Create Your First Explainer Video Storyboard Today
Once the sketches are done and approved, the illustrators from the video production company will start creating fully-designed scenes with all the graphics you provided. Or if it’s a live-action video, that’s when the directors instruct the camera crew and actors to ensure that everything goes according to your sketches.
However, don’t worry if you’re having trouble handling the storyboard for your explainer video. Sketching explainer video scenes, especially for the first time, can be a demanding task.
You’ll need to have experience with visual storytelling and understand a good deal of video production’s “behind the scenes” to nail it down perfectly. That’s why for the most part, the video production company likes to take the storyboarding off your plate and create it intern with qualified crew members.
But if you feel you can best reach the creative you’re looking for; you can do it yourself. But we strongly recommend that you have it reviewed or get a talented professional to walk you through the process.
In need of creative? Get a quick estimate
Find the right type of creative to meet your marketing goals and get an instant estimation on how much it would cost to produce it.